@joreg :I know it’s like Left/Middle/Right, which is totally non intuitive and annoying.
Left for change time/value is just much more friendly, since it’s default behavior in most user interfaces.
I just changed the code to use left button only, keep cursor visible and remove the cursor moving up down the screen, and I suddenly had a huge relief when using it. It just feels suddenly remotely usable, I don’t want to throw my pc out of the window every time I move a pin anymore ;)
Also added color input pins to allow to change keyframe/background/text color it also starts to even become readable ;)
fine with toggle for drag behaviour.
i’d argue no need for a toggle for the mouse cursor visibility. it just needs to be on. i obviously blindly modelled that after the pin-drag behavior which was a mistake. since we’re actually moving the keyframes the cursor should be visible as opposed to when changing the value of a pin where the pin stays in place and a moving cursor would be confusing.
@joreg: it’s a bit hard to describe in words, but i guess you have used logic, cubase, after effects or similar where you have a timeline of tracks which contain some segments which contain the actual keyframe data so that these segments could easily be duplicated, truncated or re-arranged in other ways on the fly.
I came across another wish the other day, you can add midi tracks which is great, but you dont get midi note out of a pin, that would be lovely, can you see/edit the velocity either?
after effects’s logic of nested compositions would be great. kind of subtimelines system. it makes possible to build very complex time-based system with lots of variable values by still keeping overview.
@dimix. yep after effects is doing this right. things which are also different and better compared to timeliner (my opinion)
tracks use bars defining the active period/active keyframes in time (movable)
tracks contain simple keyframes (no curve /curve is hidden) similar to minimized timerliner track
a track contains multiple values / timerliner needs a track for every value - with spreaded tracks you loose control very quickly because of missing names/value boxes on the left
these values are modified in the track area on the left which displays the current state of values at the point in time / timerliner uses the space for minimum,maxium which could be replaced
the keyframe itself can only be moved back and forth in time - no value editing there !
hence setting values and defining when these values should happen is separated gui-wise
keyframes can be set by context menu (rightclick) to ease or linear, no need for curve visualization nor twiddling
if you want to, go to the curve editor
and yes, nesting completes this UI very well
i’d say the after effects timeline works much simpler (apart from nesting) in a way and is therefore less prone for making mistakes.
i rarely need UNDO there, but in timeliner i do.
edit: what about making tracks more object-based, letting them consist of various datatype keyframes. output pin is message referring to velcromes great plugin. less pins, can replicate nodes per track, more suitable for centralization
would be nice also to have some easy and fast way to put stuff into the timeliner, like selecting some node and then on the hotkey (ctrl+J for example), it gets colored and all its free input pins are now controlled by the timeliner
@cat i agree the midi output is a bit strange. the slice index of the a slice where you have a channel/velocity output is the note. see? velocity is returned via outputpin but cannot be changed.
@u7 i don’t get “tracks use bars defining the active period/active keyframes in time (movable)”
@dimix: concerning nesting…isn’t this already possible? not within the gui of course but you can easily create different timelines and by setting their time-input manually kind of nest them. or (apart from visual nesting) would there be more to it i am missing?
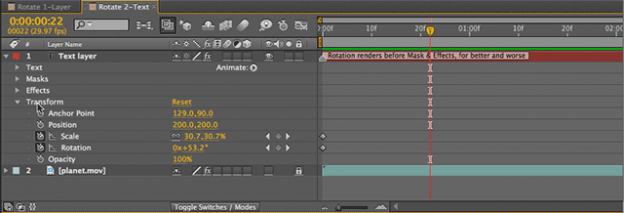
the bar in a AE track acts as an indicator for keyframes in minimized mode. lets you move the whole animation in time. AE only allows one bar per track.
minor feature in AE ,bar controls visibilty of frames - no bar at point in time = blackframe. could be used for setting up cues for the player node. you remember ?
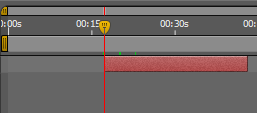
minimized:
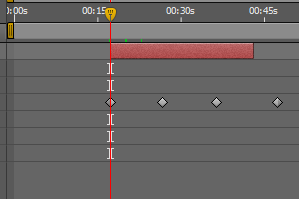
maximized:
i’d be happy to show you the AE workflow in berlin in case you don’t have someone hooked with this software nearby…or visit you anyway and get on your nerves ;)